Overview
GFI Archiver uses the journaling feature of Microsoft® Exchange Server to get a copy of every email and store them in its Archive Stores. This article covers the steps to create a Journal Mailbox.
The process of adding a new journaling address consists of two steps:
-
Create a new mailbox dedicated to journaling.
-
Configure journaling in Microsoft® Exchange.
Choose the journaling type that is available for the Microsoft Exchange Server version in use. For more information, refer to preparing the Journal Mailbox in Microsoft® Exchange Server.
Process
Setting up Standard Journaling
-
Create a New Journaling Mailbox:
-
Launch the Microsoft Exchange Management Console.
-
Expand the Recipient Configuration node and click on the Mailbox node.
-
Choose New Mailbox from the Actions pane.
-
Choose the User Mailbox option and click Next.
-
Choose the New user option and click Next.
-
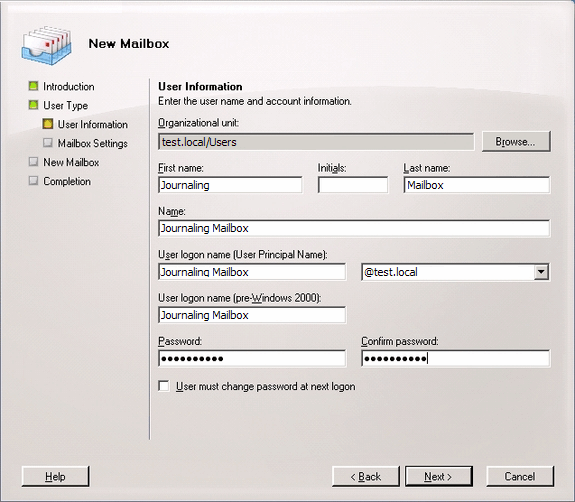
Specify the User information details for the new user to which the new journaling mailbox will be assigned and click Next.
-
Enter an Alias for the journaling mailbox and click Next.
-
Review the new mailbox summary for the new mailbox and click New.
-
-
Configure Standard Journaling:
-
Launch the Microsoft Exchange Management Console.
-
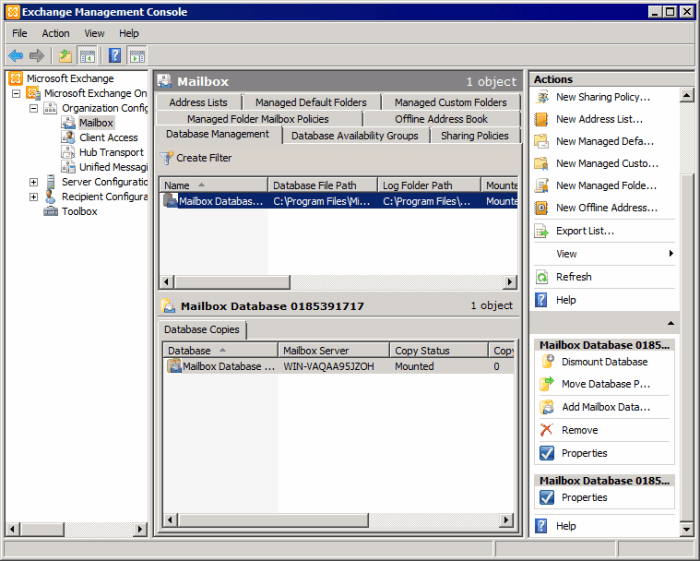
Go to Microsoft Exchange > Organization Configuration > Mailbox node. Right-click the Mailbox database and choose Properties.
-
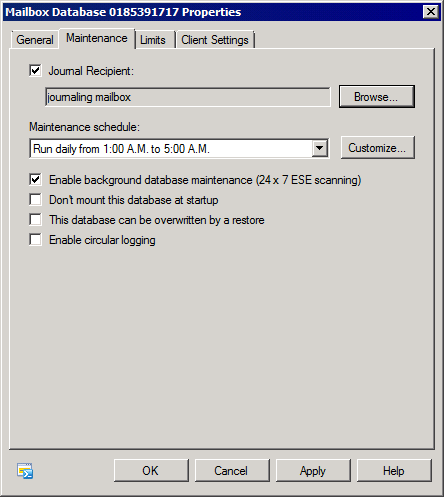
From the Mailbox Database Properties dialog, choose the Maintenance tab and check the Journal Recipient box. Click Browse and select the previously configured journaling mailbox.
-
Click OK to finalize the setup.
-
Setting up Premium Journaling
-
Create a New Journaling Mailbox
-
Launch the Microsoft Exchange Management Console.
-
Go to Microsoft Exchange > Organization Configuration > Mailbox node. Right-click the Mailbox database and choose Properties.
-
From the mailbox database properties dialog, choose the Maintenance tab, and check the Journal Recipient box. Click Browse and select the previously configured journaling mailbox.
-
Click OK to finalize the setup.
-
-
Configure Premium Journaling:
-
Launch Microsoft Exchange Management Console.
-
Expand Organization Configuration > Hub Transport node and choose the Journaling tab
-
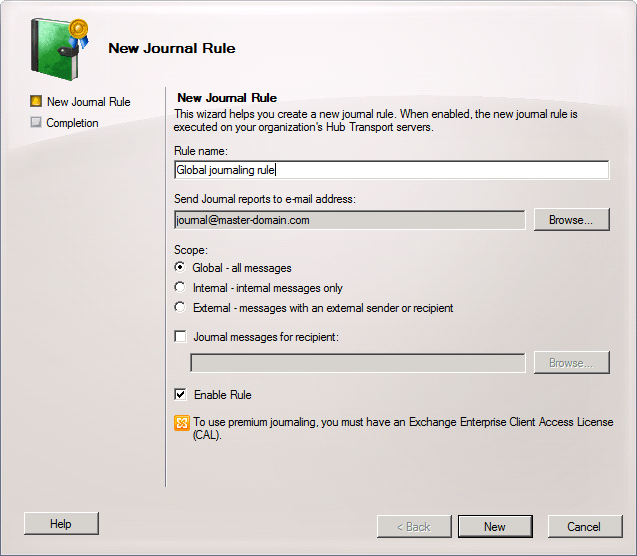
From the Actions tab, click New Journal Rule.
-
Enter a name for the new rule under Rule name.
-
Click Browse to choose the journaling mailbox to send journal reports.
-
(Optional) Configure:
-
Scope - Choose whether to journal all emails (Global), internal or external email.
-
Journal messages for the recipient - choose the specific recipient(s) for this journaling rule.
-
-
Ensure that the Enable Rule option is enabled and click New.
-


Priyanka Bhotika
Comments