Overview
The user import feature enables the addition of users to GFI FaxMaker from GFI Directory or from Windows®. This is achieved by importing users in bulk to the GFI Directory and then to GFI FaxMaker.
The import process is provided in this article.
Information
This feature is only available when GFI FaxMaker uses GFI Directory as a user directory service.
Process
Importing users to GFI FaxMaker involves three main steps:
- Creating the CSV file.
- Importing the file into GFI Directory.
- Importing the users using the GFI FaxMaker User Import Tool.
Step 1: Create the CSV File
Refer to the following guideline to create a CSV file:
- Use the template provided with GFI FaxMaker as the baseline and modify it accordingly. The template can be downloaded from Add User > Import then click download template.
- On the first line, type the field names separated by commas (
,). - Use a line per user and their correspondent details. Add the details in the same order of the fields in the first line.
NOTE: The following makes the file invalid:
- Adding a user that already exists.
- A missing required field for a single user.
The file should contain the following details:
| # | Name | Required | Description |
| 1 | First name |
No | Key in the user's first name. |
| 2 | Last name |
No | Key in the user's surname. |
| 3 | Display name |
Yes | The user's display name. For example, John Smith. |
| 4 | Username |
Yes | The Username that will be used to log in GFI Directory and in other GFI Software Ltd applications. For example, jsmith. |
| 5 | Email |
Yes |
The user email address. |
| 6 | Description |
No | Description of user. For example, Senior. |
| 7 | Groups |
No |
You can assign each user to one or more Groups. Separate multiple group names by a semicolon |
| 8 | Address |
No |
User's street address. |
| 9 | Company |
No | The name of the organization or business. |
| 10 | Department |
No | The department name to which this user belongs. |
| 11 | Phone |
No | User's telephone number. |
| 12 | Mobile |
No | User's mobile number. |
| 13 | Fax |
No | User's fax number. |
| 14 | Office |
No | The office name to which this user belongs. |
| 15 | Password |
Yes | User password to be provided when logging into the network. |
Figure 1: CSV file contents
Step 2: Import the File into GFI Directory
- From the GFI Directory console, go to Manage > Users.
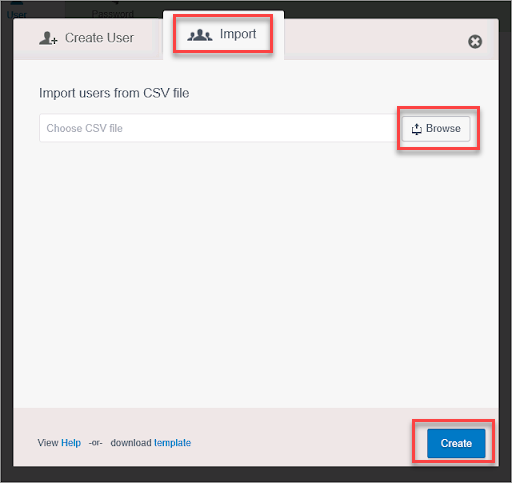
- Click Add Users.
- From the Import tab, click Browse and choose the CSV file containing the list of users to import.
Figure 2: Importing users from CSV file to GFI Directory
- Click Create.
Step 3: Import the Users to GFI FaxMaker
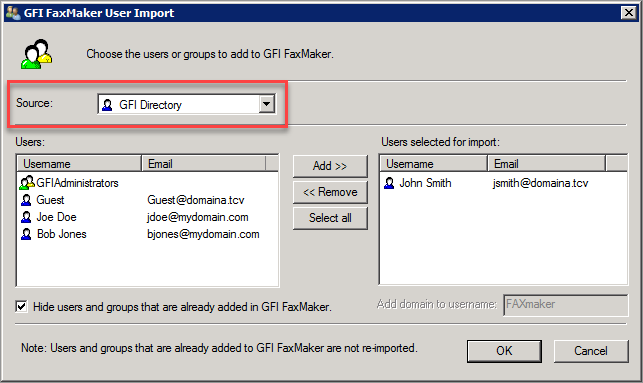
- From the GFI FaxMaker Configuration tool, right-click Licensed users and select Import users…. The following window is displayed:
Figure 3: Selecting users to import to GFI FaxMaker
-
From Source, choose from where you would like to import the users (the three options are described in the following table):
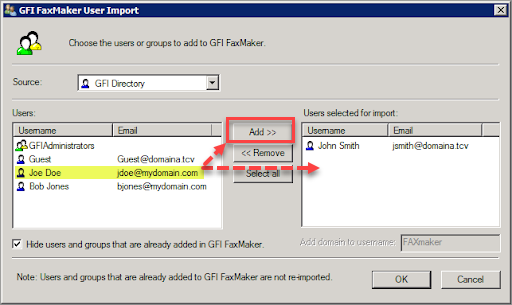
Source Description GFI Directory Add users from GFI Directory. Select the users to import and click Add (see Figure 5 below). Local machine Import Windows® user accounts from the GFI FaxMaker server. Select the users to import and click Add (see Figure 5 below).
NOTE: Since Windows account users do not have an email address available, one needs to be configured. To use the account name and append a domain to it, specify the email domain in the Add domain to username field. For example, if the username is JohnSmith and the domain is mydomain.com, the generated email address is JohnSmith@mydomain.com. If the email address is different, you can change the email address later from the Licensed users screen.
Remote machine Import Windows® user accounts from a separate server. Key in the remote server name or IP address and click List users. Select the users to import and click Add (see Figure 5 below).
NOTE: Since Windows account users do not have an email address available, one needs to be configured. To use the account name and append a domain to it, specify the email domain in the Add domain to username field. For example, if the username is JohnSmith and the domain is mydomain.com, the generated email address is JohnSmith@mydomain.com. If the email address is different, you can change the email address later from the Licensed users screen.
Figure 4: Selecting the source location to import the users
Figure 5: Selecting the users to add to GFI FaxMaker
- On selecting the users to add, click OK. Users are now included in the Licensed Users screen and can start using GFI FaxMaker.
- For users to log in and send faxes/SMS using the web client, send them a Welcome email so that they can set an account password. Select the added users and click Send welcome email.
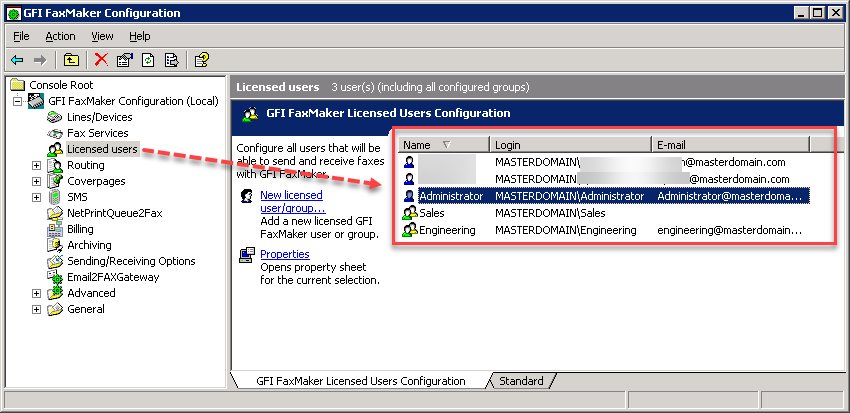
Confirmation
The imported list of users should now be visible in GFI FaxMaker Configuration > Licensed users:
Priyanka Bhotika
Comments