Overview
The objective of this guide is to extract all emails found in an SQL Server only installation, store them temporarily on disk and then migrate them into a new SQL Server with File System either for necessity or to improve overall performance.
The difference between the two solutions is as follows:
-
GFI Archiver installation using SQL Server only stores the emails within the database.
-
GFI Archiver installation using SQL Server with File System stores the emails in the directory:
<GFI Archiver installation path>\Databases\Default\Binary. This is the directory that would contain the Bix files.
Prerequisites
-
Create a backup of the database as a safety precaution.
-
It is recommended to update to the latest version before performing this procedure. This process is supported by GFI Archiver 2013 and later.
-
Requires Microsoft SQL Server® 2005 or later (including SQL Server® Express editions). Not applicable for Firebird database.
-
Ensure that GFI Archiver is not connected to the database during the operation. It is also recommended to close all database tools and applications using the database during the process.
-
It is highly recommended to disable antivirus while this process is being done since files will be temporarily handled on disk.
-
Have enough storage space on all disks related GFI Archiver installation since we will export email data.
-
Default installation path for GFI Archiver is
C:\Program Files\GFI\Archiver\.
Process
The process to migrate emails is covered in two steps:
- Export the emails from the Database to Bix Files.
- Import the Bix Files to a new Instance of SQL Server with File System using movebix.exe.
Export the emails from the Database to Bix Files.
-
Download the tool from GFI Archiver Support.
-
Note down the Microsoft SQL Server instance, the database name and the Path to the binary source.
-
Open the web interface and navigate to Configuration > Archive Stores
-
Highlight the source Archive Store > select Summary button
-
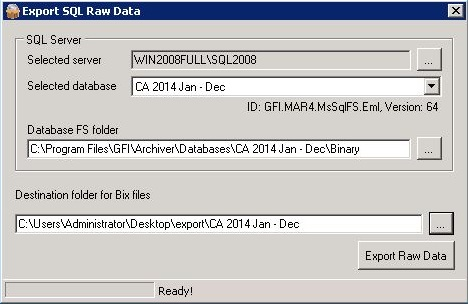
Click on the executable file to open the tool and fill out the necessary information.
Option
Description
Selected Server
Click ... to select the Microsoft SQL Server where the GFI Archiver database is located. Provide also, the username and password to connect to the selected database or select Windows Authentication to use Windows credentials.
Selected database
Select the database to export. When using Microsoft SQL Server with File System, specify the source path in the Database FS folder field.
Database FS folder
If you are using Microsoft SQL Server with File System, key in the path of the binary sources files. This option is not available when using Microsoft SQL Server without a file system.
Destination folder for Bix files
Enter the destination path of the exported .bix files. You can modify this destination.
Import the Bix Files to a new Instance of SQL Server with File System using movebix.exe.
Note: You can alternatively use copybix.exe if you want to copy the files instead of just moving them, but it is not recommended on low storage environments since this option effectively duplicates the content.
-
Launch Microsoft Windows command prompt and change the directory to
<GFI Archiver installation path>\MAIS\bin. -
Execute movebix.exe as follows:
movebix.exe <source binary path> <GFI Archiver installation path>\MAIS\Pickup
The source binary path is the one you selected under the Destination folder for Bix Files in the Export Steps above.
Once the steps are followed, the Bix files are moved to the Mail Archiver Import Service Pickup folder where they will be processed by Archiver to be stored in the database.
You can check the <GFI Archiver installation path>\MAIS\Pickup directory to confirm that the files moved correctly. However, this is just a temporary location before they are transferred to the proper <GFI Archiver installation path>\Databases\Database_Name\Binary folder.
Priyanka Bhotika
Comments