Overview
A distributed denial-of-service (DDoS) attack is one of the most powerful weapons on the internet. When you hear about a website being “brought down by hackers,” it generally means it has become a victim of a DDoS attack. In short, this means that hackers have attempted to make a website or computer unavailable by flooding or crashing the website with too much traffic.
In a DDoS attack, the incoming traffic flooding the victim originates from many different sources. This makes it impossible to stop the attack simply by blocking a single source.
This article provides instructions on how to enable the protective measures in Kerio Control against such an attack.
Prerequisites
Process
To protect your network from DDoS attacks, please follow the steps below to update the settings in Kerio Control:
-
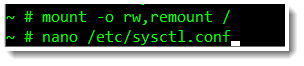
Log in to the Kerio Control console via SSH.
-
Run the following command:
mount -o rw,remount / -
Open the
/etc/sysctl.conffile via Nano or Vim:-
nano /etc/sysctl.conf -
vi /etc/sysctl.conf
-
-
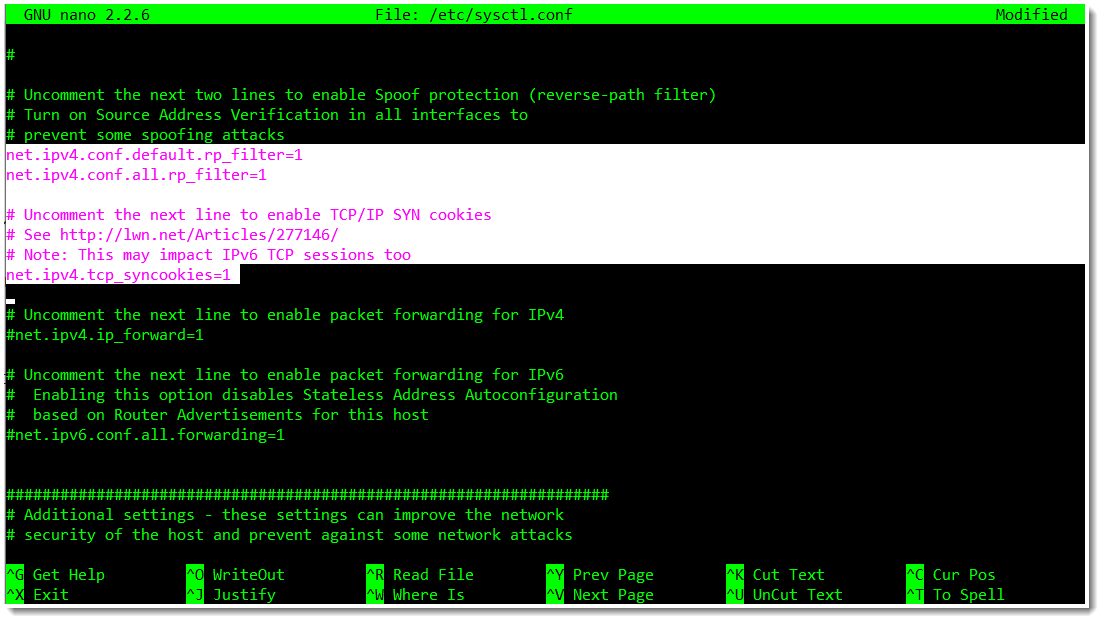
Uncomment each of the following lines by removing
#before each line:net.ipv4.conf.default.rp_filter=1net.ipv4.conf.all.rp_filter=1net.ipv4.tcp_syncookies=1
After modification, the file should look like this:
-
Save the file by pressing Ctrl+O.
-
Restart Kerio Control by using the following command:
/etc/boxinit.d/60winroute restart
-
(Optional) Depending on your network setup/environment, it is possible to improve the security of the firewall further. Follow these steps:
-
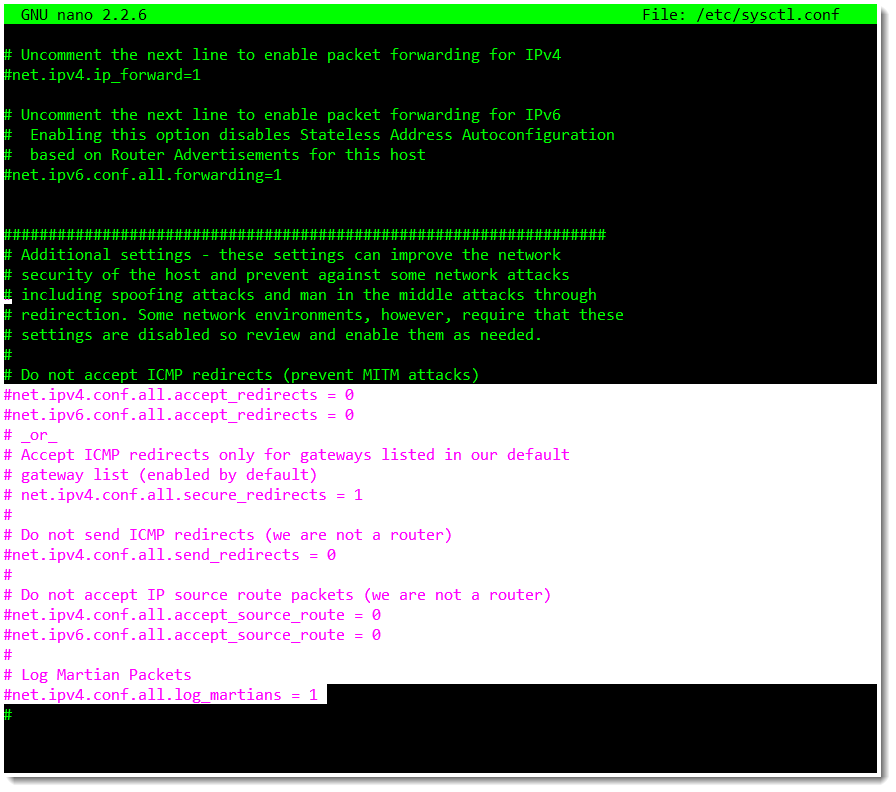
Uncomment the following lines in the
/etc/sysctl.conffile:net.ipv4.conf.all.accept_redirects=0net.ipv6.conf.all.accept_redirects=0net.ipv4.conf.all.secure_redirects=1net.ipv4.conf.all.send_redirects=0net.ipv4.conf.all.accept_source_route=0net.ipv6.conf.all.accept_source_route=0net.ipv4.conf.all.log_martians=1
-
Restart Kerio Control using the command in Step 6.
-

Additional Information
The following steps are workarounds for DDOS protection that can be performed from Kerio Control Webadmin or SSH:
-
Look up the IP location of the attackers to identify where they are, and add the countries into the Geo IP filter list.
To find the IP address, look in the Security log, for example:
[01/Nov/2019 18:54:58] IPS: Port Scan, protocol: TCP, source: 1.1.1.1, destination: x.x.x.x,(where x.x.x.x is the attackers' IP address)
[01/Nov/2019 18:55:20] IPS: Packet drop, severity: Blacklist, Rule ID: 1:2402000 ET DROP Dshield Block Listed Source group 1, proto:TCP, ip/port:1.1.1.1:47834 -> x.x.x.x:37980 -
Disconnect Kerio Control for 20-30 minutes so that attackers will be redirected to a different target.
-
Create an IP address group with the IPV4 network and insert it into the traffic rule to block unwanted traffic.
-
Increase the Connection limits.
- Decrease the
DefaultTcpTimeoutvariable:
- Log in via SSH.
- Run the following commands:
/opt/kerio/winroute/tinydbclient "update Firewall set DefaultTcpTimeout=10"
/etc/boxinit.d/60winroute restart
Note: The default TCP timeout value is
40, and it should be modified only as a last resort. If you experience some issues after this modification, please re-set the value to the default (40).
Priyanka Bhotika
Comments