Overview
Kerio VPN tunnel allows the administrator to connect officers located on separated geographic areas into a single network. Kerio VPN tunnel offers authentication and encryption to ensure a fast and secure connection.
Step-By-Step Guide
To configure Kerio VPN tunnel:
Adding a new Kerio VPN tunnel
- In the administration interface, go to Interfaces.
- Click Add> VPN Tunnel.
- Type a name for the new tunnel. Each Kerio VPN tunnel must have a unique name. This name is used in the table of interfaces, in traffic rules and interface statistics.
- Set the tunnel as:
-
Active to connect to a remote endpoint. Type the hostname of the remote Kerio VPN server. Specify also the port number if it differs from
4090(for example,server.company.com:4100). - Passive if the local end of the tunnel has a fixed IP address and accept only incoming connections.
-
Active to connect to a remote endpoint. Type the hostname of the remote Kerio VPN server. Specify also the port number if it differs from
- As Type, select Kerio VPN.
- On the Authentication tab, specify the fingerprint for the local and remote Kerio VPN server certificates. If the local endpoint is in the active mode, the certificate of the remote endpoint and its fingerprint can be downloaded by clicking Detect remote certificate. In the configuration of the remote server, specify the fingerprint of this local server.
- Save your settings.
NOTE: All local networks at each location must have unique IP subnets. Before connecting two sites using Kerio VPN Tunnel, make sure that their local network ranges are not the same. Otherwise, the routing does not work.
Configuring routing
By default, routes to all local subnets at the Kerio VPN server are defined. You can also specify other routes:
- In the administration interface, go to Interfaces.
- Double-click a VPN tunnel.
- On the Remote Networks tab, select Use custom routes. If Use routes provided automatically by the remote endpoint is also selected, custom routes are used instead in case of a collision.
- Click Add.
- In the Add Route dialog box, define a network, mask, and description.
- Save your settings.
Configuring multi-site tunnels
Kerio Control VPN automatically exchanges routing information based on the same order it establishes each tunnel. It does not implement prioritization or optimal path routing. For scenarios that involve more than two VPN tunnels, you can designate a central endpoint in a star topology.
For example, if you have four sites named A, B, C, and D and you designate D as the central endpoint. The tunnels configuration is done as follows:
A <------> D
B <------> D
C <------> D
The star topology forces all VPN routing through a single endpoint. In case that endpoint is unavailable, all sites become unreachable. To improve the reliability of this topology, you can designate a secondary central endpoint using VPN failover configuration.
Configuring VPN failover
If Kerio Control uses load balancing between multiple Internet links, it is possible to use VPN failover.
VPN failover ensures that a Kerio VPN tunnel is re-established automatically in case the primary link used for VPN tunneling becomes unavailable.
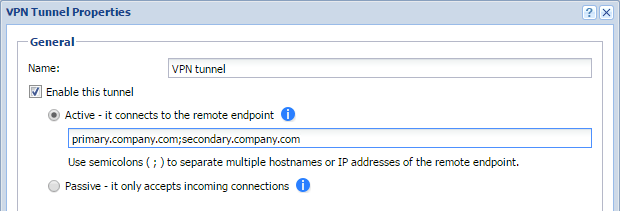
To configure failover, input all remote endpoints (by hostname or IP address), separated by semicolons, into the Kerio VPN tunnel properties (see the image below).
NOTE: When attempting to establish the tunnel, Kerio Control cycles through the list of the endpoints in the same order that they are listed in the VPN Tunnel Properties.
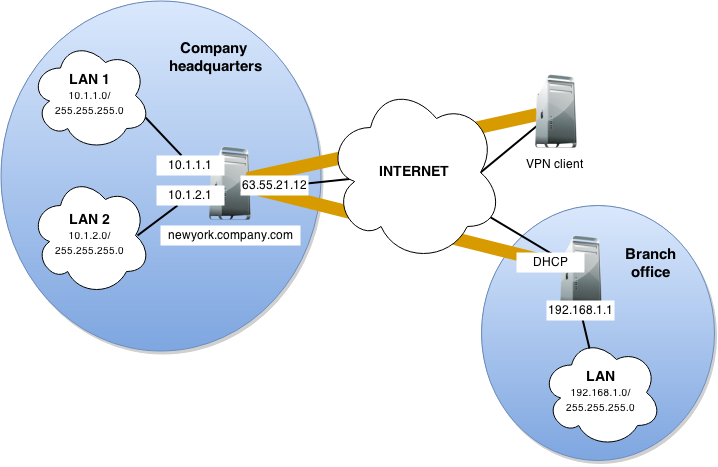
Example - Company with one branch office
This example describes how to connect two company local networks using the Kerio VPN tunnel.
In this example:
- The headquarters office (the default gateway) uses the public IP address
85.17.210.230withnewyork.company.comas the DNS name. The branch office server uses a dynamic IP address assigned by DHCP. - The headquarters has two subnets,
LAN1andLAN2withcompany.comas the DNS name. The branch office network has a single subnet,LANand usesbranch.company.comas the DNS name.
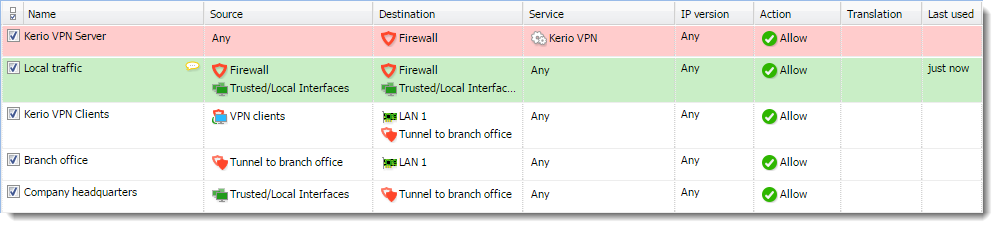
The traffic between both networks and VPN clients follows these rules:
- VPN clients can connect to
LAN1and the branch office network (LAN). - Users cannot connect to VPN clients from any network.
- From the branch office, users can connect only to the
LAN1network, and only theWWW,FTP, andMicrosoft SQLservices are available. - There are no restrictions for connections from the headquarters office to the branch office.
You must configure the following settings:
- In the headquarters, Kerio Control administration, define the Kerio VPN tunnel. The active endpoint is at the branch office (dynamic IP address). The passive endpoint is at the headquarters server (public IP address).

- Verify the tunnel is created. If not, refer to the Error log, check the certificate fingerprints, and the availability of the remote server.
- In traffic rules, allow traffic between the local network, remote network, and VPN clients.
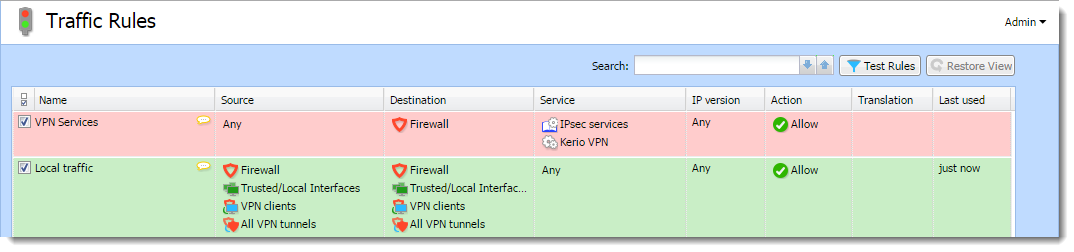
- Set traffic restrictions at the headquarter's server. On the branch office server, only traffic between the local network and the VPN tunnel is enabled.
Confirmation
Kerio VPN tunnel is now configured. Test the connection from each local network. Test availability both through the IP addresses and DNS names. Use the ping and tracert (traceroute) system commands. If the test through IP address does not respond, check the traffic rule configuration and verify that the subnets do not collide. If the IP address test is OK and the DNS test fails (Unknown host), check the DNS configuration.
Priyanka Bhotika
Comments