Overview
Even though the NAT(Network address translation) technology used in Kerio Control enables direct access to the Internet from all local hosts, it contains a standard non-transparent proxy server.
This is useful, for example, when Kerio Control is deployed within a network with many hosts where the proxy server has been used. Thus, the Internet connection is kept if a proxy server is used, and there is no need to re-configure all the host (or only some hosts require re-configuration). This article covers the steps to configure Proxy Servers with Kerio Control.
Note: The proxy server can be used for HTTP, HTTPS, and FTP protocols. The proxy server does not support the SOCKS protocol. Which is an Internet protocol that exchanges network packets between a client and server through a proxy server.
Important: If a non-transparent proxy server is being used, the filtering of HTTPS connections does not work. For additional information, refer to Filtering HTTPS Connections.
Step-By-Step Guide
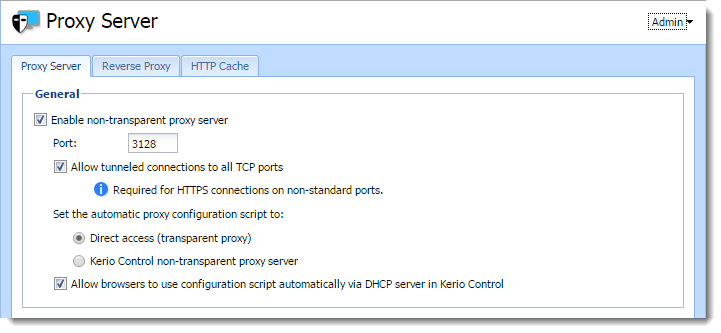
- In the administration interface, go to Proxy Server.
- Check the option Enable non-transparent proxy server. This option enables the HTTP proxy server in Kerio Control on the port in the Port entry (port 3128 is set by the default).
- To enable a tunneled connection on non-standard TCP ports (e.g. connecting to remote Kerio Control administration placed on the Internet from your local network), check the option Allow tunneled connections to all TCP ports.
Note: This option affects HTTPS traffic only. You can always access HTTP on any port via non-transparent proxy.
- Click Apply.
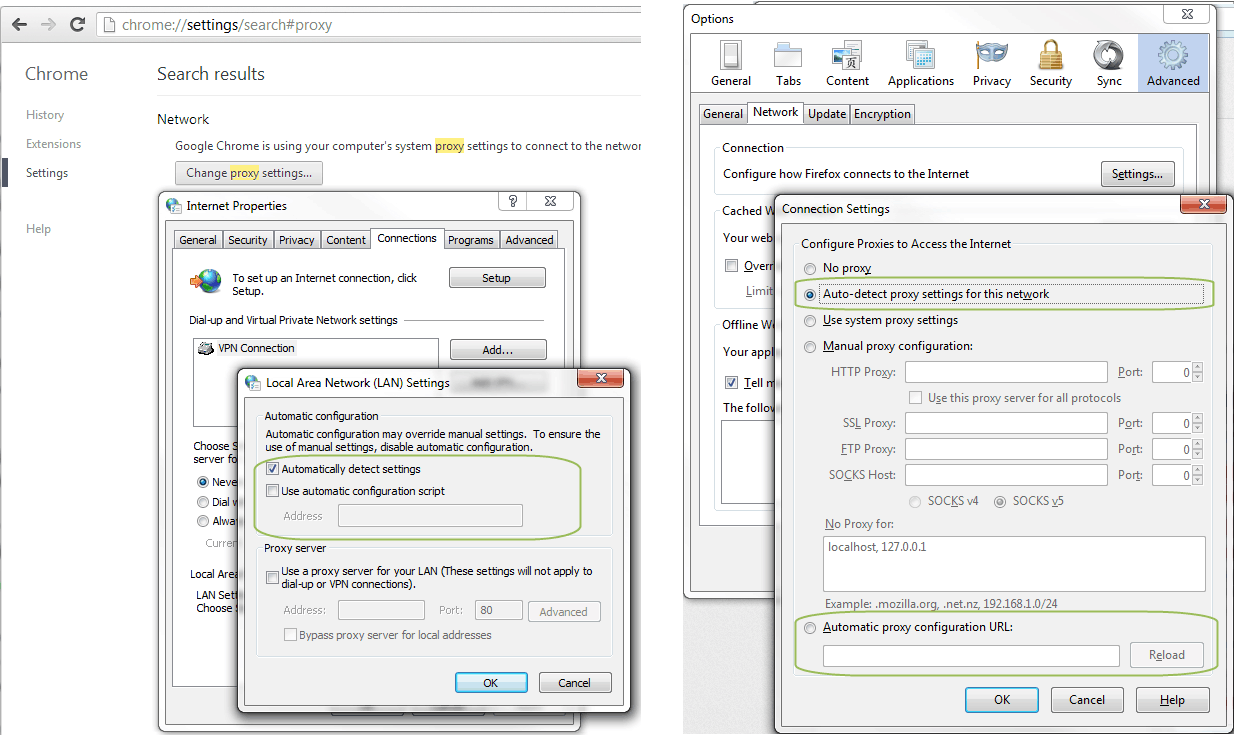
Configuring Browsers
To communicate through a non-transparent proxy server, you must configure web browsers on client hosts. You have several options for this configuration:
- Configure browsers manually: Enter the IP address or DNS name of the proxy server and port (3128 is the default port for Kerio Control) in the proxy server settings in the browser.
- In the Kerio Control administration in the Proxy Server section, switch the mode for automatic proxy configuration script to Kerio Control non-transparent proxy server, and add the following address to the browsers settings:
http://192.168.1.1:3128/pac/proxy.pacwhere192.168.1.1is the IP address of the Kerio Control host and number3128represents the port of the proxy server. - In the Kerio Control administration in the Proxy Server section, switch the mode for automatic proxy configuration script to Allow browsers to use configuration script automatically via DHCP server in Kerio Control. All browsers must choose the option Automatically detect settings in the proxy server settings.
Note: The automatic configuration of browsers may take several hours. Browsers must ask for a new configuration.
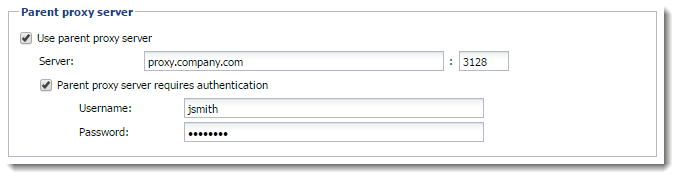
Forwarding to Parent Proxy Server
You can use a parent proxy server for non-transparent proxy traffic, update checks, Kerio Antivirus updates downloads, and for connecting to the online Kerio Control Web Filter databases.
- In the administration interface, go to Proxy Server.
- Check Use parent proxy server.
- Enter the IP address or the DNS name of the parent proxy server to the Server field.
- Enter a port number after the colon.
- If your provider gives you credentials for authentication, check the option Parent proxy server requires authentication and enter the credentials.
Note: Credentials are sent with each HTTP request. Only Basic authentication is supported.
Priyanka Bhotika
Comments