Overview
Kerio Control does not provide any built-in Simple Mail Transfer Protocol (SMTP) server. If you want to get alerts, notifications, statistics, and reports to your mailbox, use the MyKerio notification service or configure an SMTP relay server.
This article shares the process of configuring an SMTP relay server.
Note: By default, MyKerio notification service sends all emails from Kerio Control, but the amount of emails this service can send is limited per 24 hours. If you expect a large number of emails from your appliance, use SMTP relay instead.
Process
Follow these steps:
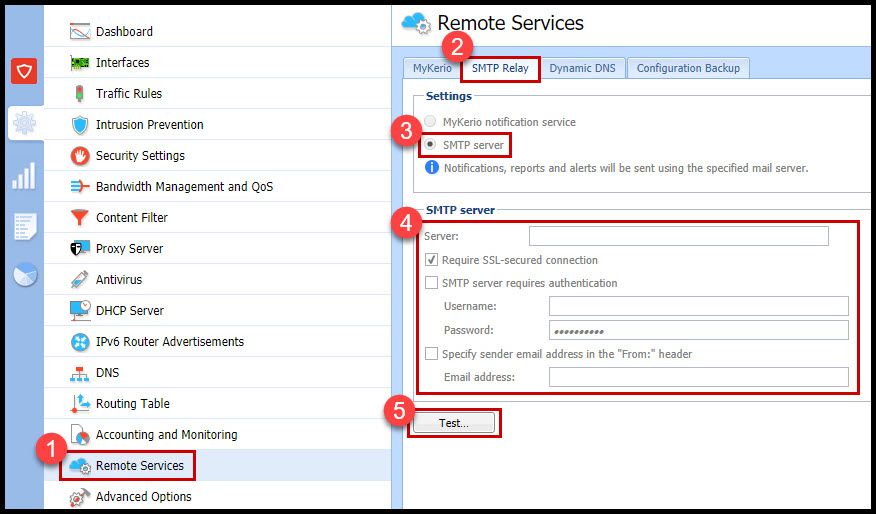
- In the Administration interface, navigate to Remote Services.
- Open the SMTP Relay tab.
- Select the SMTP server.
- Enter the following details for the SMTP server:
- In the Server field, type the DNS name or IP address of the server. If available, use an SMTP server within the local network (messages are often addressed to local users).
- Mark the checkbox next to Require SSL-secured connection. Kerio Control selects the best method available when this option is enabled.
- If the SMTP server requires authentication, input the username and password at the specified SMTP server.
- Specify an email address in the Specify sender email address in the "From:" header field. This item must be preset, especially if the SMTP server strictly checks the header (messages without or with an invalid Form header are considered spams).
Note: Preset From header does not apply to messages forwarded during antivirus check.
- Click Test.
- In the Email Address dialog, type your email address for testing the connection and click OK.
- Click Apply.
Confirmation
The SMTP relay server is configured, and you start receiving alerts in your mailbox.
Priyanka Bhotika
Comments