Overview
In order to safely install the Kerio Control Box NG series, specific instructions should be followed. The appliances provide a complex set of features for security of local networks, control of user access to the Internet, and monitoring of user activity. It also includes tools for secure interconnection of company offices and the connection of remote clients to the LAN via the Internet (VPN).
Kerio Control version 9.3 and onwards does not support 32-bit hardware.
Prerequisites
General Safety Instructions
Follow these security instructions during the installation:
- Place the appliance on a flat surface or securely mount it horizontally in a rack enclosure.
- Do not attempt to open or disassemble the appliance for any reason.
- Strictly follow the connection and installation instructions, as indicated in the sections below.
- Do not place the appliance near a heat source.
- Place the appliance in a ventilated space, making sure that the appliance fans and vents are unobstructed at all times.
- Do not expose the appliance to liquids of any kind. In the event of a liquid intrusion, unplug the appliance immediately.
- Verify that the voltage and frequency of the power socket match with the values printed on the power adapter before plugging it in. Use only the power adapter supplied with the appliance.
- Do not place any items on top of the power cable. Keep the power cable away from walkways or other areas where it could pose a tripping hazard.
Diagnosis
Kerio Control Box NG series are hardware appliances distributed as UTM (United Threat Management) solution in the following models:
- Kerio Control Box NG100 — Desktop appliance
- Kerio Control Box NG300 — Sub-1U table mountable appliance
- Kerio Control Box NG500 — 1U rack-mountable appliance
Note: Learn more about license options, pricing, license purchase, and system requirements.
NG Series Features
Refer to the table below to learn about the general features in all of these models:
| Feature | Description |
|---|---|
| Serial port | Used for connecting to a console with a serial cable. |
| USB ports | Input for USB devices. |
| Ethernet network ports | Used for connecting to the Internet and the LAN with an Ethernet cable. |
| Antennas | Dual-band antenna used for Wi-Fi. |
Kerio Control Box NG100W (front + back)
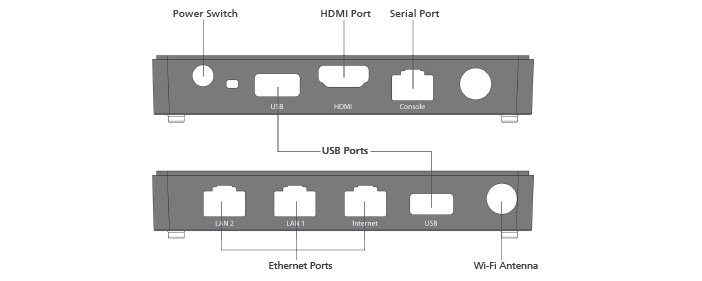
Kerio Control Box NG300W (front + back)

Kerio Control Box NG500 (back)

Solution
Setting up the Connections
Once a suitable place has been located for the appliance, and it has been plugged into a power outlet according to the safety instructions (indicated above), connect it to the network. Refer to the figures below to learn about the connection settings for each model:
Connecting Kerio Control Box NG100W to the network

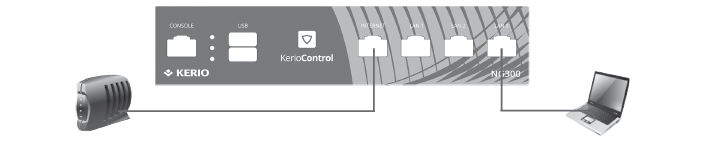
Connecting Kerio Control Box NG300W to the network
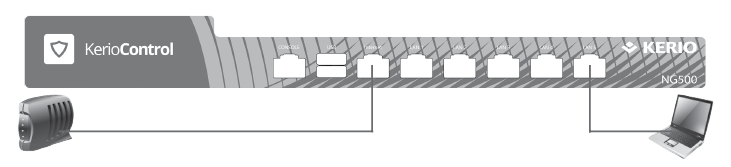
Connecting Kerio Control Box NG500 to the network
Installing and Configuring
- Connect the antennas to the hardware appliance.
- Connect the Internet port to the Internet (e.g., DSL or Cable modem) using an Ethernet cable.
- Connect the LAN port to the computer, as indicated in the figures above for each model.
- Turn on the appliance and add it to MyKerio using either of the following options:
- Adding using the MyKerio settings in the Kerio Control Administration console.
- Adding through a browser with these steps:
- Set the networking preferences for Ethernet on the connected computer to Automatic DHCP configuration. (You can change it later after the configuration is complete).
- Renew the DHCP lease on the computer and confirm it has an IP address of
10.10.10.11. - Open a web browser and connect to the Kerio Control Administration web interface using the URL:
https://10.10.10.1/admin - Ignore the SSL certificate warnings and proceed to the configuration wizard.
- Follow the instructions provided by the wizard and configure the appliance.
Priyanka Bhotika
Comments