Overview
This article explains the procedure of Installing GFI FaxMaker for the first time.
Before starting the installation process, please make sure that the machine meets the software and hardware requirements for installing GFI FaxMaker.
Process
To install GFI FaxMaker, please follow the steps below.
- Download the GFI FaxMaker installer.
- Right-click the GFI FaxMaker installer and choose Properties. From the General tab, click Unblock and then Apply. This step is required to prevent the operating system from blocking certain actions of the installer.
Note: Some files need to be unblocked to avoid security warnings and to aid in permission related issues when the installation is being done with User Access Control (UAC) is enabled. Please read the Microsoft Windows blocks downloaded GFI Software file article to unblock files. - Launch the GFI FaxMaker installer.
- Select the relevant installation language and click OK.
- On the welcome screen, click Next.
- To check for a newer build other than the one being installed, select Check for a newer build of GFI FaxMaker on the GFI web site and click Next. Otherwise, select Do not check for a new build and click Next.
Note: An active internet connection is required to check for a newer build. - Read the license agreement and click Agree to accept and proceed.
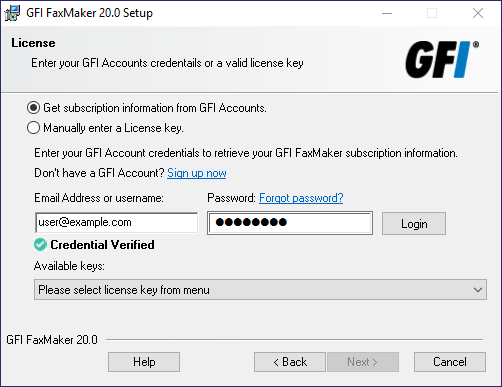
- Select a method to enter your subscription details, as explained and shown below. Then click Next button to proceed.
Option Description Get subscription information from GFI Accounts This option is selected by default. In the Email Address or username and Password fields, enter your GFI Accounts Portal credentials or the account used when signing up to download GFI FaxMaker. Click Login to retrieve the license keys registered to your account. Choose a key from the Available keys drop-down. If you do not have a GFI account yet, click Sign up now and fill in the registration form. Manually enter a License key Select this option the copy and paste a license key if you already have one. Click OK to validate the license.
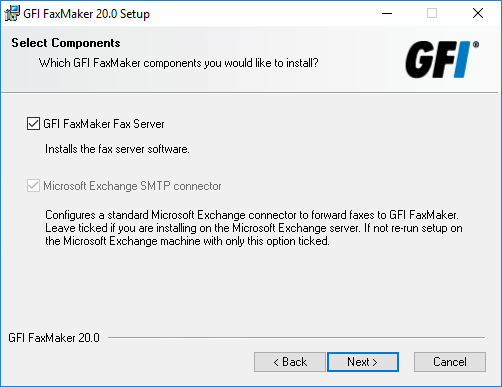
- Select the components to install and click Next.
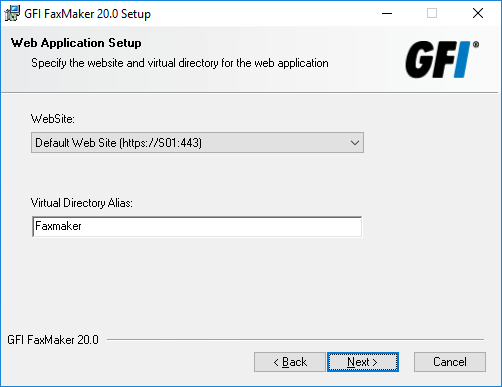
- Web Application settings: Choose the IIS website where you want to host the GFI FaxMaker virtual directory and key in a name for the virtual directory, which by default is Faxmaker. Click Next.
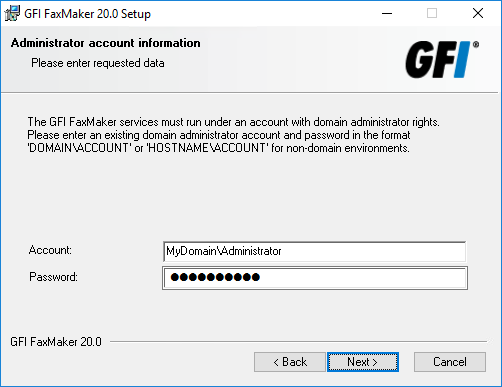
- Provide credentials of an account with administrative privileges to be used for GFI FaxMaker services management. Click Next.
Note: If changing the password after installing GFI FaxMaker, update the password for the GFI FaxMaker services from the Services applet. When GFI FaxMaker is installed in a domain, these credentials are also used to connect to Active Directory and retrieve the list of users.
- Click Next to continue installing GFI FaxMaker to the default folder or Browse to select a new installation path.
- Click Next to install GFI FaxMaker. In certain environments, you may be prompted to restart the IIS SMTP service.
- Click Finish.
After installation, the GFI FaxMaker Configuration Wizard is automatically launched to help you configure basic settings.
Confirmation
The installation process will prompt you on the successful installation of GFI FaxMaker.
Priyanka Bhotika
Comments