Overview
Kerio Antivirus is integrated protection against malicious emails with viruses. Viruses may infect computers and cause harm to files or computer systems. Kerio Connect Antivirus has additional settings for messages that cannot be scanned, e.g. corrupted files or attachments. It includes delivering the message with a warning or rejecting the message if it was a virus option.
This article describes the process to properly configure the integrated antivirus in Kerio Connect.
Solution
Configuring the Antivirus
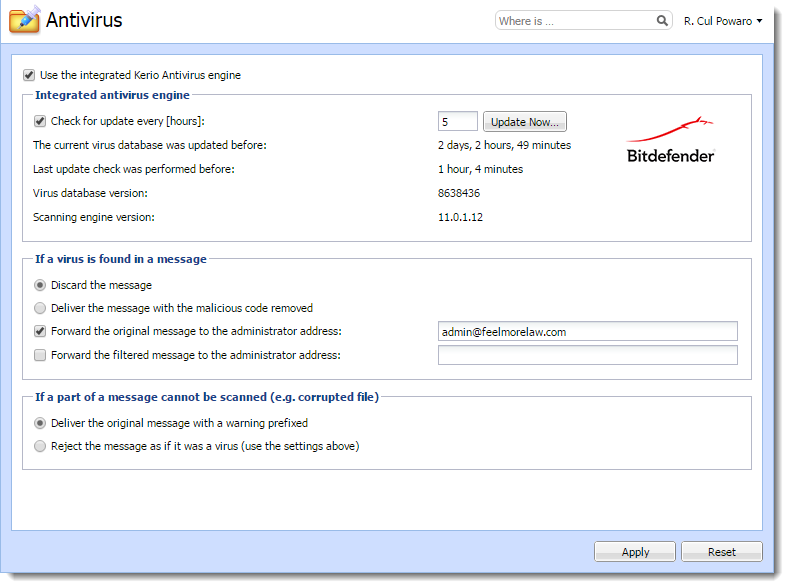
- In the administration interface, go to Configuration > Content Filter > Antivirus.
- Choose the option Use the integrated Kerio Antivirus engine.
- To update the virus database automatically, choose the option Check for update every [hours] and specify the number of hours. If any new update is available, it is downloaded automatically. Kerio Connect downloads the database files via the HTTP protocol. Provide a persistent connection and allow the communication on the firewall or Proxy server.
- Choose the action to perform for messages that contain a virus. Kerio Connect can either Discard the message or Deliver the message with the malicious code removed.
- In addition, it is possible to choose between two options for forwarding messages. Choose either to Forward the original message to an administrator address or Forward the filtered message to an administrator address.
- For any message that Kerio Antivirus cannot scan, Kerio Connect can either Deliver the original message with a warning prefixed or Reject the message as if it was a virus.
Note: it's not possible to disable this option for individual domains, it's server-wide setting.
- Click Apply.
Updating the Antivirus Database
After installing Kerio Connect, download the initial Kerio Antivirus definitions. Without it, the mail queue will be stopped. The update starts automatically shortly after installing/updating the server.
If the Kerio Connect server is behind a firewall, allow HTTPS connection to:
- bdupdate.kerio.com
- bdupdate-cdn.kerio.com
- update.kerio.com
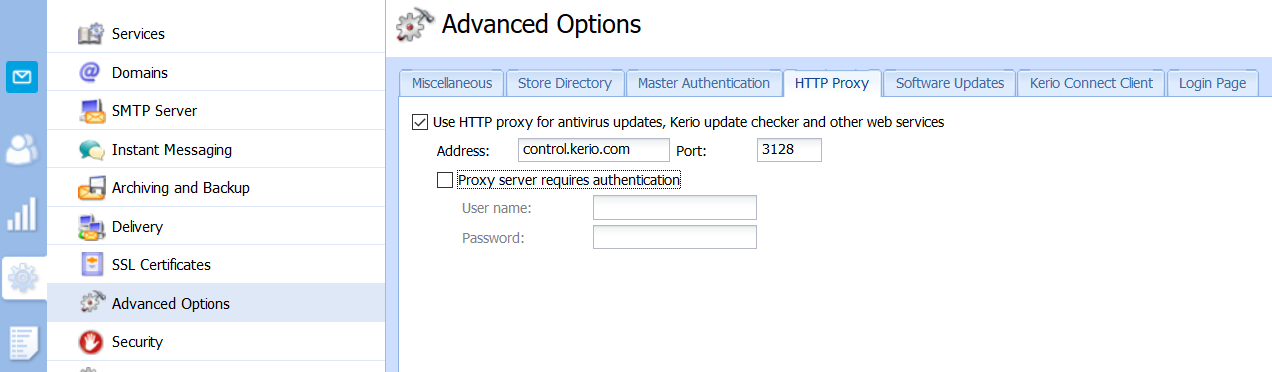
Configuring the HTTP Proxy Server
If the computer with Kerio Connect is behind a firewall, it is possible to use a proxy server to check for virus database updates. To configure the proxy server:
- Go to Configuration > Advanced Options > HTTP Proxy.
- Choose Use HTTP proxy for antivirus updates...
- Enter the address and port of the proxy server.
- (Optional) If the proxy server requires authentications, choose the option Proxy server requires authentication.
- Enter the username and password.
- Click Apply.
Confirmation: Go to Configuration > Content Filter > Antivirus and click Update Now to check the connection.
Troubleshooting
To view the statistics for Kerio Connect antivirus control, go to Status > Statistics. This section displays the number of messages checked, viruses detected, and prohibited attachments.

Priyanka Bhotika
Comments