Overview
This article provides detail about how to create Domain aliases and User aliases in Kerio Connect, the potential of this feature in the email flow and case use scenarios to take full advantage of this capability.
Process
In Kerio Connect, aliases create virtual (alternative)
- Domain names (the part after @ changes)
- User names (the part before @ changes)
You can combine both types of aliases.
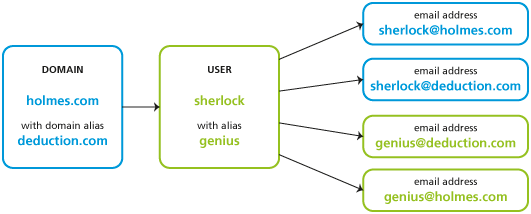
Map of aliases for a single user account
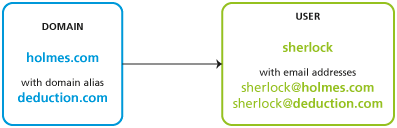
Domain aliases
Each domain can have any number of alternative names — aliases.
You can use domain aliases for email delivery. Users cannot use them to:
- login to the Kerio Connect administration interface
- login to Kerio Connect Client
- view the Free/Busy server
Each user in a domain with domain aliases can have an according to the number of email addresses (within a single mailbox). In the image below we can see that the account has a domain called holmes.com and a domain alias called deduction.com. Therefore, the user sherlock is automatically provisioned with the email address sherlock@holmes.com and an email alias sherlock@deduction.com pointing to his inbox at sherlock@holmes.com.
NOTE: Once you rename a domain, an alias is automatically created from the original name.
To create a domain alias
- In the administration interface, go to Configuration > Domains.
- Double-click a domain and go to the Aliases tab.
- Click on Add and type an alias.
- Confirm and save.
Important: To make the alias exist on the Internet, create a corresponding MX record in DNS for each alias.
Username aliases
Each account or group can be associated with any number of aliases (i.e. different names).
Aliases can be linked to:
- A user
- A group
- An existing alias
NOTE: If a message is sent to a username, it is marked by a flag so that the aliases are not looped. If such a message arrives at the username marked by the flag, it will be stored in the mailbox that belongs to the last unmarked alias.
Each user with, for example, four aliases has four email addresses (within a single mailbox):
If users have username aliases defined, they can select from which addresses they want to send their messages. For more information refer to Defining your addresses.
Creating username aliases
To create an email alias in Kerio Connect, follow these steps:
- In the administration interface, go to Accounts > Aliases.
- Select a domain for the alias and click Add.
-
Type the name of the alias. The alias may contain the following characters:
- a-z — all lower-case letters (no special characters)
- A-Z— all upper-case letters (no special characters)
- 0-9 — all numbers
- . — dot
- - — dash
- _ — underscore
- ? — question mark
- * — asterisk
-
The messages can be delivered to:
- An email address — type the email address or click Select.
- Public folder — select the public folder form the menu.
NOTE: This item is active only in case at least one email public folder.
- Confirm and save.
Example
Mr Sherlock Holmes has an account with username sherlock in domain holmes.com(therefore, his email address is sherlock@holmes.com).
Since he finds himself very smart (what else), he wants another email address — genius@holmes.com. The problem is he does not want to manage two accounts.
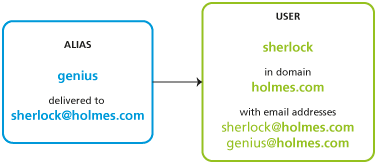
He orders Dr Watson to create an alias in section Accounts > Aliases. The alias is genius and is delivered to email address sherlock@holmes.com.
From now on, all messages sent to genius@homes.com will be delivered to sherlock@holmes.com
In user's settings on tab Email Addresses, you can also specify aliases for individual users:
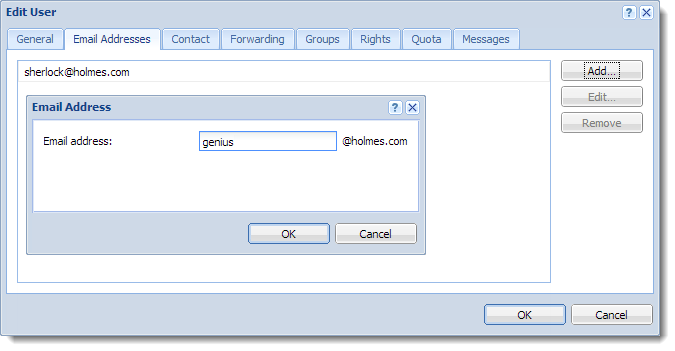
The same goes for groups — specify aliases on tab Email Addresses in the group's settings.
Case uses
- Alias for messages to be stored in a public folder
Mr Holmes wants messages sent to info@holmes.com to be stored in the Info public folder. The alias is: Info > #public/Info.
- Alias for messages sent to invalid addresses to be delivered to a specific user
Mr Holmes does not want to be troubled with people who cannot write correct addresses. Therefore, he has created an alias for such messages to be sent to Dr Watson so that he does not need to deal with them. This is done by this alias: * > will be sent to watson.
NOTE: If this alias is not defined, Kerio Connect returns such messages to their senders as un-deliverable.
- Alias as a protection against wrong spelling — one character
Mr Sherlock Holmes wishes to filter messages which may contain interesting cases. These are messages sent to addresses like kill@holmes.com (potential murder cases) or will@holmes.com (interesting inheritance cases). To avoid creating many aliases, Mr Holmes creates only the following one which will cover both addresses: ?ill > will be sent to sherlock.
- Alias as a protection against wrong spelling — numerous characters
Some languages have different spellings for one sound. Thus, Mr Holmes's first name can be written, for example, as sherlock, scherlock, serlock, etc. The following alias will cover all these cases: *erlock > will be sent to sherlock.
Checking aliases
In Kerio Connect you can verify all the aliases
- In the administration interface, go to section Accounts > Aliases.
- Click the Check Address button (bottom right corner).
- Enter any email address — real, misspelled, virtual, alias, made-up, etc.
- Click Check.
The Result table displays the target addresses to which messages sent to the entered address will be delivered.
Priyanka Bhotika
Comments