Overview:
This article briefs about managing user accounts in Kerio Control
User accounts are used to:
- Authenticate users with their username and password, optionally with 2-step verification. For more information refer to Configuring 2-step verification.
- Gather reporting data in Kerio Control Statistics. For more information refer to Reading managerial statistics and reports in Kerio Control.
- Set access rights for Kerio Control administration. For more information refer to Setting access rights in Kerio Control.
- Add users to groups. For more information refer to Creating user groups in Kerio Control.
- Automatic user login. For more information refer to Configuring automatic user login.
- Set quotas for users. For more information refer to Managing user quotas in Kerio Control.
- Set a language for users. For more information refer to Customizing the language used in Kerio Control interfaces.
- Set web content rules. For more information refer to Blocking web object elements for particular users.
- Control user access to the Internet from local networks. See Monitoring active connections and Monitoring active hosts.
Users are managed in the Users section of the administration interface.
You can add either new local accounts or existing accounts from a directory service.
Adding local accounts
You need local accounts in the following cases:
- Microsoft Active Directory or Apple Open Directory is not used in your environment.
- You want to add local administration accounts.
To create a local account:
- In the administration interface, go to the Users section.
- Click Add.
- In the Add User dialog box, type the username and password (other items are optional). Usernames are not case-sensitive.
- Click OK.
NOTE
If you plan to create numerous local accounts with similar settings, use a template.
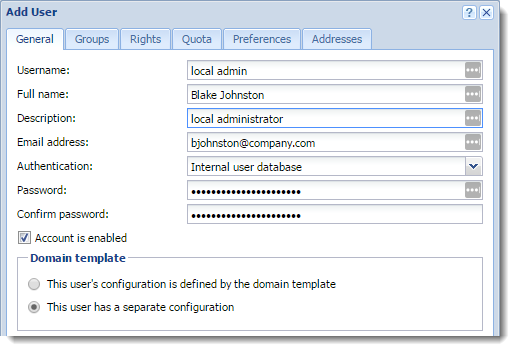
Adding a local administration account
The advantage of local administrator accounts is that such users can authenticate locally even if the network communication fails.
- In the administration interface, go to the Users section.
- Click Add.
- In the Add User dialog box, type the username and password and confirm password. Usernames are not case-sensitive.
- In the Authentication drop-down list, select Internal user database.
- In the Domain template part, select This user has a separate configuration.
Now, you can edit the Rights tab independently of other users.
- Go to the Rights tab.
- Select Full access to administration.
- (Optional) Select also additional rights Users can unlock HTTP content rule, Users can control dial-up lines, and Users can connect using VPN.
- Click OK.
From now on, the local administrator account works and the user can access Kerio Control Administration with it.
Adding accounts from a directory service
For more information refer to Connecting Kerio Control to directory service.
Using templates
Each domain in Kerio Control includes a template. If you are planning to create numerous accounts with similar settings, or change one item for all users in the domain, use the template for it:
- In the administration interface, go to Users section.
- Click Template.
- In the template, specify all the settings which are common for all users from this domain.
- Save the settings.
- In the Users section, click Add/Edit a user.
- In the Add/Edit user dialog, select This user's configuration is defined by the domain template.

Deleting user accounts
User accounts can be suspended temporarily or deleted permanently.
You cannot disable/delete the following users:
- You, if you are logged in Kerio Control Administration.
- Automatically generated Admin user
Disabling users temporarily
When you disable user accounts temporarily, users cannot login to Kerio Control.
- In the administration interface, go to Users.
- Double-click the user, and on the General tab, clear the Account is enabled option.
- Save your settings.
Deleting users permanently
- In the administration interface, go to Users.
- Select the user, and click Remove.
- In the Confirm Action dialog, click Yes.
Kerio Control deletes the user.
Priyanka Bhotika
Comments