Overview
The following log messages mean that the device is running out of disk space. Hence it is unable to perform normally.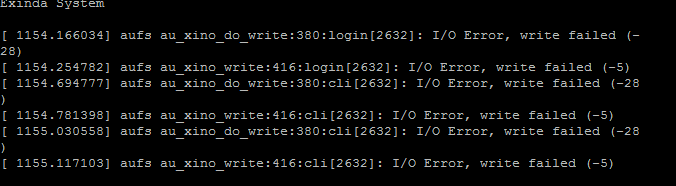
Users might not be able to boot the firmware on the Exinda due to this as well
Cause
Disk usage high due to jboss temporary filestmp directory filled up with incomplete dumps/captures/snapshots
This is generally seen in smaller units like 2061 Exindas.
Resolution
If the unit is unable to boot normally, we can go into single user mode while the device is trying to boot and clear the files causing disk usage high from that console.The requirements for this are:
1. A console connection to the Exinda
2. Ability to power on/off the unit manually
3. Internet connection to the machine on which console screen is displayed so that TAC can organize a meeting and view the console connection to help
Additional Information
Please contact Exinda TAC so that we can get into single user mode and determine what is causing issuesInternal Notes
How to go to Single user modeFirst, the system must be rebooted or power cycled. It is assumed the person following this procedure is able to access the system's console and can see the entire boot process (this is either over a serial console or the system's direct console).
Step 1: While the system reboots, monitor the screen on which all the boot processes show up. As soon as you see ÒBoot Loading Stage 2Ó Booting from default Image.. etc.. Interrupt that by hitting any key, you see something like below
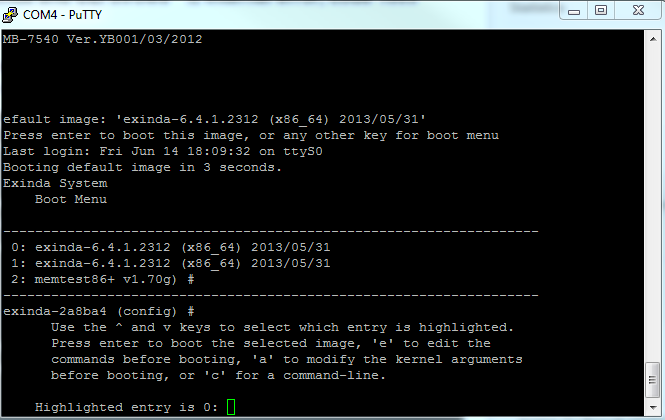
Step2: Now use the arrow key and select the version you want and type ÒeÓ where you see the green cursor blinking. It gives you the following screen
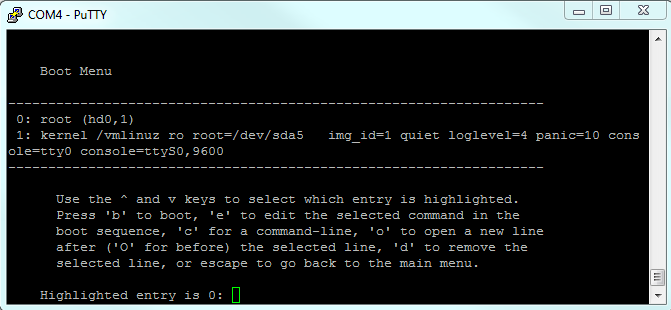
Step3: Now, use the down arrow key to make the highlighted entry Ò1Ó and press ÒeÓ again. You will see some text to edit as in the screen below

Now, in the line at the bottom of the screen, add text such that the final line is as follows:
<el=4 panic=10 console=tty0 console=ttyS0, 9600n8 single
Step4: After this hit enter and you will see the following screen
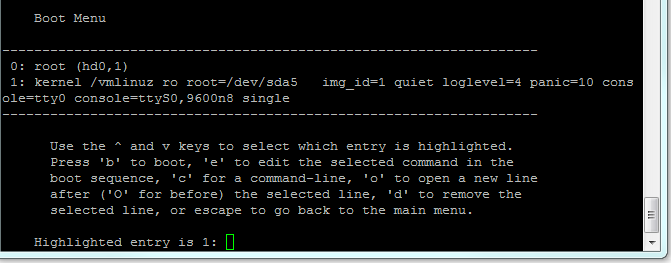
Now press ÒbÓ to reboot the Exinda and make sure the highlighted entry is Ò1Ó
Step5: After more boot messages a 'root' user prompt should be displayed something as below:
resh-3.2 #
This is the normal shell access to the appliance. You can browse directories here and check which directory is filled up the most and could be causing disk issues.
The command to check the top filled directories is - du -x /var | sort -rn | head -20?
Priyanka Bhotika
Comments