Overview
Configuration of Kerio Control VPN client on Windows OS requires a certain procedure to be followed. The installation of Kerio VPN client is done using a standard installer package, that modifies Windows Network drivers to include VPN support.
This article will guide you on how to install and configure Kerio VPN Client for Windows.
Solution
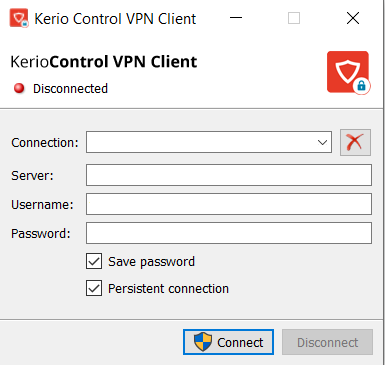
- Download and install Kerio Control VPN Client. Kerio Control VPN Client starts automatically after installation and you can see the Kerio Control VPN Client window.
- In the Connection field, type a name for the new connection.
- In the Server field, type the Kerio Control server name or IP address. If your administrator gives you more than one server name or IP address, separate them with semicolons.
- In the Username and Password fields, type your Kerio Control username and password.
- (Optional) Select Save password to save your password in Kerio Control VPN Client.
- (Optional) You can select a Persistent connection if you have administration rights to your computer. Persistent connections are reestablished whenever you restart your machine.
- Click on Connect.
Note: Kerio Control requires a valid SSL certificate to verify your connection when establishing the connection. If an SSL certificate warning appears, consult the warning with your administrator.
If Kerio Control VPN Client is running, the Windows taskbar displays the ![]() icon.
icon.
Removing Connections
To remove old or broken connections:
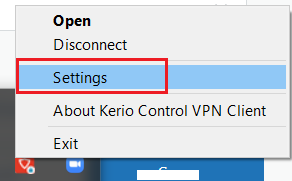
- Open Kerio Control VPN Client.
- In the Connection menu, select the connection.
- Click the
 icon. Kerio Control VPN Client asks you if you want to remove the selected connection.
 - Click on Yes and Kerio Control VPN Client will remove the connection.
Changing a Language
To change the language of the Kerio Control VPN Client interface:
- Right-click on the
 icon in the notification area of the Windows taskbar.
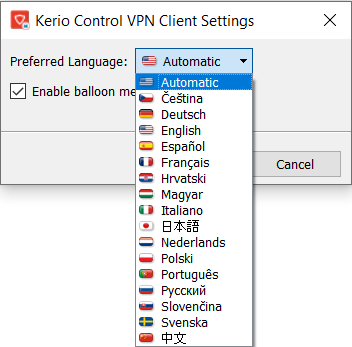
- In the context menu, click on Settings.
- In the Kerio Control VPN Client Settings dialog box, select your preferred language.
- Click on OK and Kerio Control VPN Client will switch to the new language immediately.

Enabling/Disabling Balloon Messages
A balloon message in Kerio Control VPN Client is a pop-up message that appears in the Windows taskbar at the Kerio Control VPN Client icon. To enable or disable balloon messages:
- Right-click on the icon in the notification area of the Windows taskbar.
- In the context menu, click on Settings.
- In the Kerio Control VPN Client Settings dialog box, select Enable balloon messages.
- Click on OK.
Confirmation
Kerio Control VPN Client is now installed and you will see the icon in the system tray of the taskbar.
Priyanka Bhotika
Comments