Overview
This article provides the contents of the attached Exinda 10060 Quick Start Guide.
Information
Review Contents:
- 1 x Exinda Appliance
- 2 x Power Lead
- 1 x UTP Straight cable (BLUE)
- 1 x UTP Crossover cable (RED)
- 1 x Serial cable
- 1 x Quick Start Guide
Information required for configuration:
- Speed/Duplex of Network Interface Cards (NICs)
- Email Address
Step One - Physical Installation
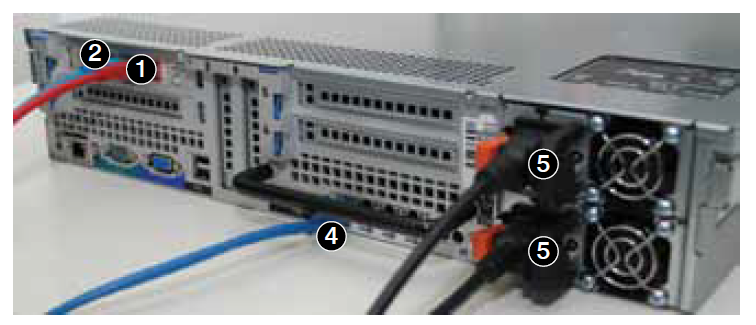
- With the appliance powered OFF install a crossover cable (red) between Exinda’s WAN port and the Router/Firewall.
- Install a straight-through cable (blue) between Exinda’s LAN port and the LAN switch.
- Ensure that there is still connectivity through the appliance. This will ensure that the Ethernet bypass is working.
- Install a straight-through cable (blue) between Exinda’s management port (Gb1) and the LAN switch.
- Plug in the power cords.
- Switch on the appliance and ensure that the NIC lights flash and traffic is passing through.
Step Two - Jump Start from Web User Interface
- The Exinda appliance by default will pick up an IP Address from DHCP. The IP Address is available on the management interface.
- Note: If a DHCP address is not picked up, the Exinda will default to the IP Address 172.14.1.57. Open a web browser and connect to the Web User Interface by typing https://172.14.1.57 in the address field. You must configure the IP Address of your PC to the same subnet as the Exinda appliance – e.g., set your IP Address to 172.14.1.58, netmask 255.255.255.0
- Click on the Exinda appliance that has been found.
- Select Basic Mode and log in with username=admin and password=exinda
- Click on Wizard and Start the Configuration Wizard.
- Complete all the steps. You are done.
Or from Serial Console / Command Line Interface
- To access the Exinda via serial console using your preferred terminal software (e.g., HyperTerm) with the following settings:
- Bits per second=9600
- Bits=8
- Parity=None
- Stop bits=1
- Flow Control=Hardware
- Login with username=admin and password=exinda.
- When prompted to run the jumpstart answer yes. If not prompted, execute the following commands to start the jumpstart:
enable, # configure terminal, # configuration jump-start
- Complete all the steps. Save, and you are done.
If you need assistance, please contact Exinda Support.
Priyanka Bhotika
Comments