Overview
While trying to deploy the security patches or install an Agent, the job status stays at Pending.
Another scenario is when a scan is initiated, it does not continue and the Scanner Activity Window only shows the following text:
STARTING SECURITY SCAN FOR MACHINE/RANGE: <target>
Profile: <Profile name>
Diagnosis
Possible causes for jobs stuck with 'pending' status are:
- The wrong IP address is used for agent deployment or remediation job
- The service account is not able to start the remediation job due to a security feature blocking its process
- In the Active Directory environment, the Restricted Groups Domain Policy is used to specify the administrator members on the domain computers
- GFI LanGuard creates its dedicated account with Local Administrator rights
- These rights may change due to GPO settings. In this situation, the LNSS_MONITOR_USR dedicated account will be removed from the local administrator's group
Solution
- On the LanGuard server go to Control Panel > Administrative Tools > Services and verify that the GFI LanGuard XX Attendant Service is running.
-
Change the account used by GFI LanGuard XX Attendant Service:
- Double-click the GFI LanGuard XX Attendant service.
- Select the Log On tab and in the Log on as: section, select This account.
- Specify an account having local administrative rights in the format
<Domain>\<User>or browse to the admin user. - Enter the Password for the specified account and click Apply.
- Choose the General tab and click Start to start the service.
-
On the LanGuard server change the DCOM identity:
- Open DCOMCNFG:
- Press Windows + R keys together.
- Type
dcomcnfgand press the Enter key.
- Expand Component Services > Computers > My Computer > DCOM Config.
- Enter the Properties of LNSSCommunicator.
- In the Identity tab, click Browse and select a user that has Administrator rights on all machines in the domain.
- Enter the password for the selected user and Apply changes.
- Open the Local Security Policy (
gpedit.msc) on the LanGuard server. - Navigate to Local Computer Policy > Computer Configuration > Windows Settings > Security Settings > Local Policies > User Rights Assignment.
- Check the properties of Replace a process level token and Adjust memory quotas for process policies.
- Add the account used in the Identity tab (above) to these policies.
- Do the same for the Logon as a batch job policy.
- Restart the GFI LanGuard XX Attendant service.
- Open DCOMCNFG:
-
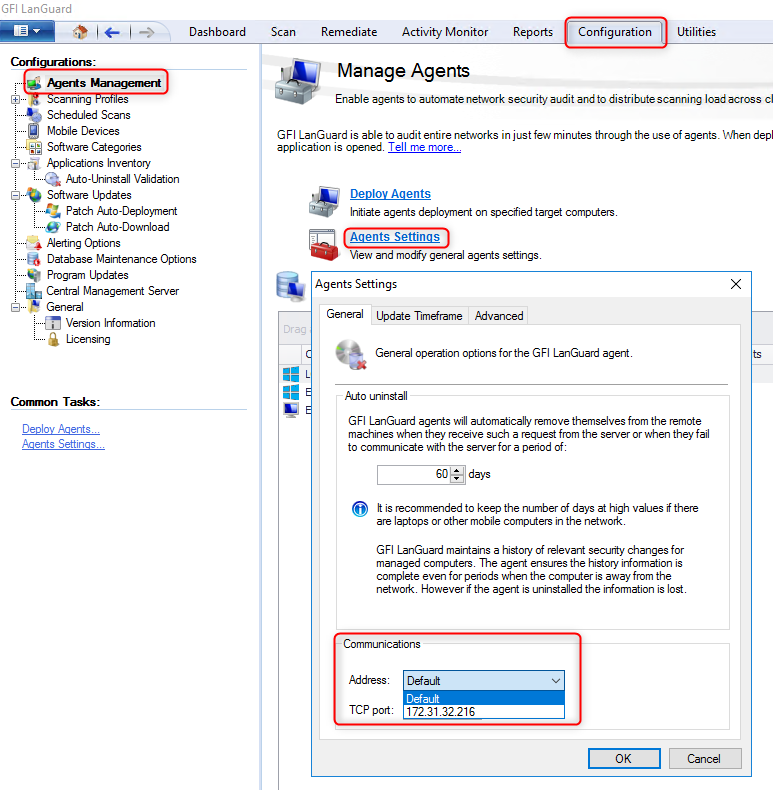
On the LanGuard server launch the LanGuard Console and update communications IP address:
- From the Configuration tab, select Agents Management.
- Click Agents Settings.
- From the General tab under Communications, select the IP address of LanGuard instead of the Default selection.
- Click OK to apply the changes.
-
On the Windows target machine(s), explicitly add the user account that is running the services to the Log on as Services Local Security Policy:
- Navigate to Start > Run and type
secpol.mscand press Enter. - Expand Local Policies.
- Choose User Rights Assignment.
- Scroll down till you see Log on as a service.
- Right-click it and go to Properties.
- Click Add User or Group and add that account there.
- Click Apply and OK and close out of the Local Security Policy.
- Apply the changes.
- Go to Run > type
GPupdate /forceand press Enter.
- Navigate to Start > Run and type
- Disable UAC on both server and client machines:
- Click Restart Now to apply the change right away, or click Restart Later and close the User Accounts tasks window.
- Clear the Use User Account Control (UAC) to help protect the computer checkbox, and then click OK.
- If UAC is currently configured in Admin Approval Mode, the User Account Control message appears. Click Continue.
- In the User Accounts tasks window, click Turn User Account Control On or Off.
- In the User Accounts window, click User Accounts.
- In Control Panel, click User Accounts.
- Click Start, and then click Control Panel.
NOTE: If LanGuard has more network interface cards, the wrong one can be used for agent deployment or the remediation. Disable these network interface cards locally and run a localhost scan using the HW audit in LanGuard to update the correct IP address before starting a new agent deployment and remediation.
Start a new agent deployment or remediation to verify whether the problem is gone. If the issue persists, try the steps below:
- On the LanGuard server verify that the GFI LanGuard XX Attendant Service is running.
-
On the LanGuard server change the DCOM identity:
- Open DCOMCNFG:
- Press Windows + R keys together.
- Type
dcomcnfgand press Enter key.
- Expand Component Services > Computers > My Computer > DCOM Config.
- Enter the Properties of LNSSCommunicator.
- In the Identity tab, select the Launching User radio button.
- Restart the GFI LanGuard XX Attendant service.
- Open DCOMCNFG:
Testing
Start the activity that was having issues and verify that the problem is gone.
Priyanka Bhotika
Comments